
AliciaEmmie, 15th December, University, Biomedical Science, Current, Makeup, Vintage, Family <3

 Base coat - Sally Hansen Continuous Treatment
Barry M Peach Melba and Matt White

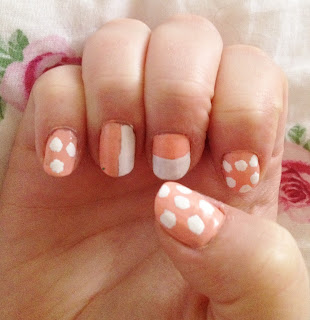
I painted 3 fingers all Peach Melba and for the two middle ones I just painted half my nail and then painted the other half using Matt White.
(You could paint all of the nail and then paint on top if you find that easier)
LET IT DRY
Use the White nail art pen to add dots.


So I promised I would upload some Christmas Nails in January to avoid out of the Christmas Blues. However my new nails wheels still haven't arrived; Arghhhh!!
I've had this design on my phone for ages but I've never had the time to sit down and do it. Today I only had one lecture at 10am for the whole day; Perfect nail painting time!

This is a tutorial showing you how you can achieve this simple but amazing look!
1

Barry M Peach Melba and Matt White

White Nail art pen for the dots
(Bought from a Chinese shop in Spain)

I painted 3 fingers all Peach Melba and for the two middle ones I just painted half my nail and then painted the other half using Matt White.
(You could paint all of the nail and then paint on top if you find that easier)
LET IT DRY
Use the White nail art pen to add dots.
2

Hot Pink, Baby Pink nail art pens from ebay
Light Blue nail art pen from Spain

Add random squiggly lines inside your white dots to make a flower shape.

For the flowers without a white blob as a background, draw squiggles in a circular shape. I imagine that the blob is there and try to work in a circle.
(My blue isn't very good and this is my right had so apologies for the messy-ness)
LET IT DRY
3

Barry M Spring Green
Green nail art pen from ebay
Nail art brush from ebay


Add little green triangles to your flowers for the leaves. I use a mixture of Barry M Spring Green with a brush and the green pen.
LET IT DRY
4

Silver square studs for nail art from ebay
Cotton Bud
Sorry I don't have a picture for this bit because you have to work fast!
Place some studs onto a solid surface with the shiny side up.
Place a small strip of topcoat or false nail glue where you want the studs to be stuck.
Lick or wet the cotton bud then place it on top of the stud.
This will lift it of the surface so you can place it onto your nail.
If re-positioning is needed, use tweezers or the wet cotton bud.
Repeat as required.
Make sure you work fast so that the top coat or glue doesn't dry before you put the stud on.
LET IT DRY
5

Topcoat - Sally Hansen Continuous Treatment
Finally apply a decent topcoat that doesn't smudge nail art. I have found this topcoat to be the best for not smudging and it's long lasting!
LET IT DRY
VOILA!


In order of use!
AliciaEmmie
x
No comments:
Post a Comment